Hello Crafty Friends, now I know that there a a large amount of tutorials out there on hand rolling flowers and there are some amazing and some not so. Anyway, all of you have expressed at the shows and in emails and on Saturdays at the show. So I have decided to do several of these so that you ladies will have my secrets(not really a secret) to making these little beauties.I mean seriously who here does not love T!M Holtz? SO we will be working on 3 of hid flower designs?dies....
Gather white paper, patterned papers, textured papers, 1" hand punch, glue gun and what ever else you need for your project, , dew drops, buttons, stickers, lace etc.....And here are the dies we will working with
These 2 dies are from the movers and shakers, a nice size in between the the larger on the bibz die and the small on the extended cuts strips. Being the hoarder and lover of all things T!M I had to have them all.. Know if you have these dies you chances are have the machine and cutting pads. If you do not have a machine, dont buy the dies without the machine, If you want like so many do, you can email me and purchase the pieces already cut for you.
This is the extended cuts strip...Cut a ton of these little beauties and layer them however you please. Complete with the leaf die as well.
This is the Bigz die, and it does have all 4 flowers on this one die....
And who can live without the Rosette die. Know this is the die with the 2 sizes on it, there is 1 more with just a large rosette. I do not have that one. Why you ask? I don't know, but will soon be fixing that.
OK so we have our dies, so lets get the rest of our supplies together. Know if you dont have the exact product I have it's ok, use what you have, or go shopping like I do. :) Kidding of course you can use what you have on hand that will match the project you are working on. I have become a believer in use your stash as I have a hell of a stash to use. ANyway here we go...
Ink Pads( I use a variety of die based pads, ( Distress ink pads, Momento, and Stazon and Stampin Up) what ever your preference is will be just fine.
With that you will also need the finger daubers, or T!M"s ink blenders
These you will need to distress the petal edges. You do not need both of these, just the one you are most comfortable with...Hint hint, a makeup sponge also works, so again if you dont own these 2 products a makeup sponge also works....
Ok so we have the flowers, the inks and the blending tools. Whats left you ask, well, if you are like me and you like to add texture to your pieces, you will again need the Sizzix die cutting machine and some embossing folders....The machine choices are completely up to you, the Big Shot, Big kick and Vegabond(T!M's design) are by sizzix. Can also use the Cuttlebug with appropriate cutting pads.
Big Shot
Vegabond
As for the embossing folders there literally hundreds upon hundreds of designs and manufacturers. All sizes will work for embossing your flowers. 2 of my favorites are the Swiss dots either large or small.
Ok so whats left for supplies you ask. (((Ht Glue Gun)) Well these are the basics, and you can certinally do more setailed work using, spray inks, markers, stamps spritz's stickles viva paper pens, and Smooch accent inks, Gesso..(LOVE THIS STUFF, that will be another tutorial all on its own)
As you become more adventrous you will tweak techniques and come up with many iodeas of your own using products blaxing your path to creativity. After all that is what this all about. Creativity...
Ok, here we go
1. cut out the desired flowers and amount of flowers needed to complete your project in whatever paper you like. Plain white or beige paper will allow you a lot more inking and stamping options. Pattern paper will allow lots of distressing options
2. If using white paper, this is when you can run them through with an embossing folder, once embossed you can leave it plain or lightly swipe your ink pad over the flower strip inking the embossed print, also inking the edges.
If you choose you may skip the embossing and stamp the rosette with your favorite image, and then coloring it if you choose to, and then ink edges.
http://timholtz.com/dies-and-embossing-videos/ once you get to this page it is the video marked Paper Rosette Die, T!M will take you through a video on this die that will be much better than my writing on how to do it... He is amazing!
Just remember that there are thousands of ways to embellish this die, and the video shows you a few of them. Once you have watched the video, come on back and see the other ways to embellish your rosettes... You may even find a technique on T!M's blog.
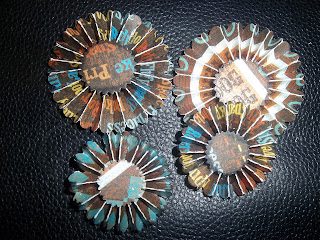
SO I sometimes like to stamp, or emboss my rosettes, or just use patterned paper to match my project. One thing I always do take all 3/4 of the dies and cut all my flowers at the same time with the papers to match my projects, the all look amazing by mixing and matching the different styles on the same project. I have some samples of finished flowers I have made for an assortment of different projects, I always bag and label the pieces so If I need more I know exactly what paper stack or company the paper is from. Sometimes I have left overs and I use them on other projects, your flowers will never ever go to waste so do not be afraid to make extra.
These are all from the T!m Holtz dies.
As you can see I used the Rosette die, as well as the Tattered florals die, and I mixed and matched and layered them all over.
The tattered floral die has 4 flowers on the die and they are beautiful each by themselves, and layered to match or layer a mix of styles. there are no rules, only creativity
I love doing the monochromatic tattered florals, and using white or black to distress the petals, or white gel pens, stickles or even smooch accents to give a bit of sparkle to any flower.
When making the flowers dont forget, the greens, or butterflies, flourishes, embellish away...
This is a cute little mini album, and yet I found plenty of room for flowers....
These flowers are not from the dies, I just wanted to show you an embossed (emboss powder) and a stamped flower.
These are flower kits I am making to embellish onn the coordinating project... The first 1 is a combo of all the different cuts
This kits here is going on a wesyern project, as you can see I do not have them all made yet
These are some of my favorite colors, they are going on a wooden purse?box that I am altering for a gal
These are dog themed and going onto my books.
These are just plain white, with embossing, or inked edges, or even punching holes in the tips. Possibilities are endless
This is a picture frame done with the T!M flower files.....SO I hope you have enjoyed and perhaps picked up a tip or two. Look for PART 2 on the flower Tutorial on Tuesday. Questions please just leave a comment or email me. If you need the flowers already precut, again just email me and I will happy to help out, have a craft happy day
¸.•*¨) (¸.•´ (¸.•´HUGS *¸.•´¸.•*´¨)
(¸-:¦:-♥(¸.•´ *Ronnie.•*´¨ )
¸.•*¨) -:¦:-♥ ♥.•*¨-:¦:-. ;.•.♥.•*¨-:¦:-. ;.•.♥


2 comments:
Oh WOW.... These pieces are AMAZING!!!!!!!! So beautiful!!!
I love it God bless you
Post a Comment