free copyright

MyFreeCopyright.com Registered & Protected

Thursday, November 26, 2009

Tri fold card


Hello again ladies....Well theres seems to be a bit of confusion concerning this card... First it is NOT a free file from ukscrappers!!!!! It is a file from a gal called scrappercarmen from the craftedge forum. HERE this is the link to the original post and to the 2 .svg files she had shared with everyone on that forum. I just didn't use the front flap from this file. Never implied this was my design, just my take on the card and embellishing it. Some times reading between the lines means ones looking to make trouble.
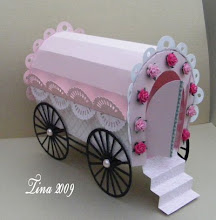
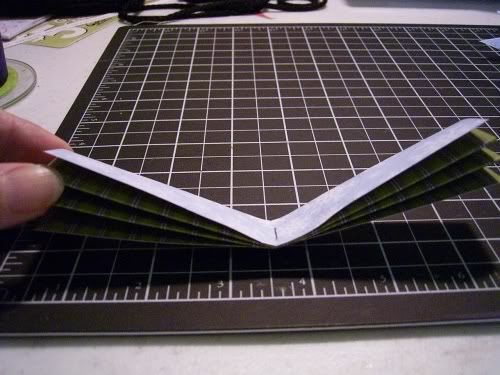
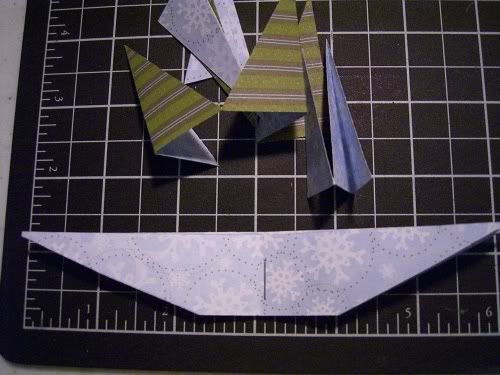
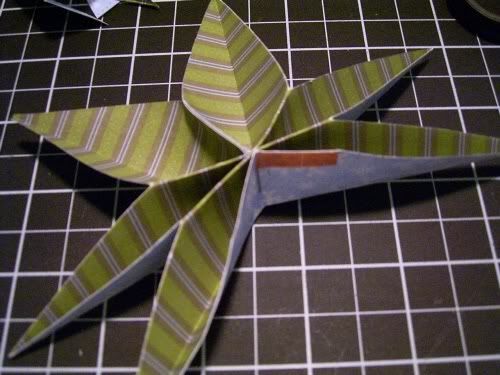
. There is also a tutorial on splitcoast stampers forum on how to make this card with an x-acto knife, a cutting mat and your scor-pal and a ruler.
I "said, "here is my take on this card" not here is my design. The offer still stands if anyone wants me to cut this card on the SIlhouette for them, I would be happy to do so for free. Just like always.
 Ronnie
One has to be a bit more caerful when promoting an awesome design, as there seems to be a lot of folk out there quick to point a finger and make a mountain out of a mole hill. Look for trouble where there is none, and cause trouble because they either thrive on it, or are not happy unless they are making some elses life miserable. Life is too short to be so petty..
So I apologize for any confusion this may have caused any of you.

Tuesday, November 24, 2009

Inky Impressions Design Team Challenge

Hello crafty ones, there is an amazing challenge going on over at inkyimpressions. Not only is the challenge awesome but one of the winners will be choosen for their Design Team.. I created this Christmas Ornament for the challenge....
Supplies needed....
ornament shaped chipboard pieces...
papers, patterned and plain.
glue sticks
stamps
ribbons(tons)
embellies of all kinds.


I started with a shaped ornament from chipboard, and covered the backs and fronts in matching papers with a glue stick. Then stamped the front cover in black ink and then took my gold gel pen and only hi-lighted certain parts of the stamped image. Used spell binders for all the matting on the front cover.
For the next 2 pages again spellbinders for the mats and random flourishes cut from my Silhouette, inked edges and again gold hi-lights as hi points.......
On these 2 pages I stamped just the outline of a Holly leaf(unknown stamp) and cut it from green card stock, and again with gel pens in golds, silvers, and bronzes did some doodling and high lighting. and used the Hollies a side spray and pop dotted it. facing page just inking and chalking along with gold bow and ribbon.

On these 2 sets of pages, basically the same things only this timeI used die cuts from Sizzix and pop-dotted them as well. Also diamond glaze on select flourished on the background papers. and white gel pens.....This project was great fun to do and I think they are adorable for stocking stuffers.

Chipboard is such a fun material to work with. My little secret is when using thinner chipboard I liie to use a glue stick to adhere back ground papers, cause when it dries, it gives the chipboard a more thicker and stable feel. It becomes less flimsy to use..
When finished decorating, add toms of ribbons and hang charms from the ribbons, don't forget you can easily attach charms to the photo frames using ribbons and safety pins, or string directly onto ribbon. You may also cover in solid papers and using stamps create your own back ground papers and color them to your liking. There are no rules and the sky's the limit. SO ladies have fun with this. Have a great day, talk to ya all on wednesday, Hugs, Ronnie
 

Hand-made Prima look alike's


Hey ladies, here are a few ideas for all of you.. I never seem to be able to finf just the right flowers for my projects. So here is a way for you to make any style of flower, and color to match any project you are working on..
WHat you will need............
1.)flower punches of all shapes and sizes, or your cricut or cuttlebug,Spellbinders or desktop cutter, what ever you have available to you...
2.) white card stock/ or black with wite ink pads
3.)Ink pads in whatever colors you like, and black
4.)your favorite stamp sets
5.)baby wipes
(6..) embossing folders
(7..)embossing powders, versa mark pad and either embossing powders, or pearl ex powders


What I do is stamp random images all over my card stock, when you are happy with the way it looks, grab your ink pads, and baby wipes, put ink on the wipes and color your stamped white card stock, in any pattern you like, use 1 color or many colors, it is up to you. When you are happy with your card stock, either hand punch your assorted flower shapes, or run them through your die-cut machines. Once you have a variety of colored flowers,  you then are ready to start embellishing them. Can emboss them with embossing folders to give them dimension, or stamp them with versa mark and emboss them with embossing powders, or with the pearl ex powders. Once you are satisfied with this, you can now begin stacking them, distressing them, do additional inking and chalking, add leaves and vines.Use brads or bling in the centers. Make them any way you wish to. And no matter what you will have flowers to match any project you are doing. The sky's the limit, and there are no rules. SO have fun with it all.


Sunday, November 22, 2009

Deer hunt widow!!!

Well, my guys are all gone as of friday morning. I am a happy girl. ANd even happier, because thursday when number 3 Son of the 4,  came home and was all smiles. He had a secret and big bag all decked out with ribbons and bows. And proudly handed it to me, and said thanks Mom for everything, this is part of your Birthday present. SO I opened up the bag and what do my eyes see......I have been drooling over this little toy since it's release 4 weeks ago. ANd there it was in my hot little hands....I have been playing non-stop with it, and having a creative burst....So have you guessed what it is yet? It designs it cuts it almost makes dinner. Ok, ok I am bursting here.....

SO here is all the info on this amazing little gadget.....YUP, it's the Gypsy by ProvoCraft..Click the link below and read all about it and how amazing this really is...I am in L.O.V.E.


http://www.cricut.com/gypsy/faq.aspx

Tuesday, November 17, 2009

Ok, Ok, A few more cute pics


Ok, here we go again, as i was sitting at the computer working on your surprises, I looked over and what did I see??  Too cute to just not share..3 of my favorite boys..

What can I say, I am a sucker for a cute photo op. ANd these faces were just too darn cute to pass up, all I need now is my Ms Kitty sitting on the couch cuddling, but at 1200 pounds not sure the couch would handle the extra tonage. Maybe next time Ms Kitty

Monday, November 16, 2009

How cute is this...


SO some of you know that I have 2 yellow labs, both full males I use for breeding, Rookie 1 1/2yrs, the light yellow and the bigggest at 100pounds, Ryder 9 months old, and about 65 pounds and a reddish yellow. When will you ever see 2 males sleeping all cuddled up together, well right here....It is so cute the way they sleeep I just had to share it with you all. Things that make me go AAWWWWW....By the way, the boys are full brothers, just a year and a half apart. Same Momma and Pappa.

Good Monday morning

Hello crafty ones...Hope you all have a great week.. I am counting down the days to the big deer hunt.....Friday morning all will be gone and once again I will be doing the HAPPY dance. All alone for 10 days to do as I  please, no cooking, no extra laundry, no listening to a man who does nothing but complain about every and anything. I can craft all day and not to stop to make supper or clean up after a man. I can stay in my Pj's and sip my coffee, and flirt with my M&M's...Have the bed to myself, and I think you all get the picture. It's a whole new way to get creative.I am pumped, for 10 days I do what I want....yippeee.. SO I have lots in store for you all and new ideas and surprises...More later

Friday, November 13, 2009

Setting up at..........

Hey ladies, Just a quick reminder that I will be set up on saturday nov 14 at the Manitowoc county expo...Gonna have my machines there so if anyone wants to play, get a lesson or two, or just come and cut things for projects you are working on, just bring your projects along. It will be a lot of fun. See ya Saturday crafty ones
Hugs,
Ronnie

Monday, November 9, 2009

Altered clipboards


Hello crafty ones, I apologize for being M.I.A. for a few days, but has been crazy busy. So Deb was looking for an idea for an altered clipboard. I have some finished, and of course no pics of them. But I do have pics of these, and these were done about a year ago for 2 different customers. SO not to worry Deb, I have some really great gift ideas coming your way and in time for Christmas....
Also this Saturday, both Shelly and I will be at the Manitowoc expo from 8am to 2 pm..I am going to have my cricut there, and l;ots of new dies for the Sizzix and Cuttlebug. Lots of Holiday dies. More info to come later this week. So stay tuned..Have a great day, happy crafting
Hugs, Ronnie

Monday, November 2, 2009

Get your blog candy, this ones great!!!

Sure Cuts A Lot Giveaway! No Purchase Necessary! A $90 Dollar Value!


SVGCuts.com is giving away a copy of Sure Cuts a Lot for PC! Why? Why not?

This giveaway is open to ANYONE! You don’t have to have SCAL to qualify, no purchase necessary! Tell all of your crafty friends and you could be a winner!

  • Take it off of your Christmas wish list!
  • Give it as a gift!
  • Use it on a third and fourth machine!
  • You decide how you’ll use it!

Giveaway Requirements

(must complete at least 1 to qualify)
  1. Post a link to this giveaway http://svgcuts.com/blog/?p=3769 on your favorite forum, Facebook, Twitter, Myspace, via email or any other creative way possible!
  2. Join our Facebook fan page. Click here to visit our page
  3. Add our banner to your blog. Click here to visit our banner page.

How Do I Enter?

  • Using the comment section at the bottom of this page, leave a comment letting us what you did to qualify. Please include URL (site address) when applicable)
  • If you posted the link on your Facebook page, make sure you are a Fan!
  • Note: Your will not appear immediately as it needs to be approved. That’s how we keep down on SPAM! Thank you for understanding!
  • Come on ladies this is a great site to visit, and a wonderful product
.

Something New is CoMiNg SOON!!!

Hello crafty ones...Well It's Monday morning, and I have been busily working on a new surprise for all of you. I hope to reveal the ********* real soon. Hoping to have it ready for showing in 2 weeks. It is something I think that will be a great tool to acheive anything thats possible...So stay tuned for sneak peeks, and little reveals...

Sunday, November 1, 2009

Make your own Christmas stars


These are sooooo super easy I can't believe I never saw them done before! I ran across the instructions in PaperCrafts Holiday Cards & More issue, designer: Gina Hanson.
Start with a 6" square of paper (all the better if printed on both sides), score and accordion fold at 1" intervals. Staple in the center.


Trim each end to a point. (The triangles trimmed off are what I used for my Christmas Tree cards )


Fan out the folds and adhere the sides with strong adhesive.


__________________