


happy Wednesday everyone. I so look forward to Wednesday's, cause it is the big challenge reveal over on cooking with cricut. HERE. Where is if you link a project to the blog you could win as every week Melin has a great give away...
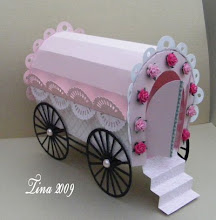
Well this week we had to use flowers, now I am a flower addict. I have them everywhere, but with the challenge of using flowers, I thought well why not, I am always admiring the handmade paper flowers everyone makes, they are just so beautiful. So I decided to try and make some flowers, now let me tell you, I usually pick up the mechanics of things fairly easy, then because of my anal ways, I have to continue to do the technique untill I feel I have it mastered, well to master these little creations are near impossible. I can not even tell you how many of these I have put together, and how many more sitting here waiting to be put together. I am not happy with them yet. But picked out a few that I actually liked.My project this week that the flowers are going is an altered canvas I am making for my friend, this a photo her prized stallion, whom they have recently lost, so this is tribute to him.

Supplies
White Canvas
Cricut machine
Pagoda cart,Plantin cart, Home accents cart and The file from CWC
assorted paper or card stock
strong adhesive
acrylic paints of assorted colors
large brush, and fan brush, baby wipes, paper towel
ink pads to match colors,
stickles to match,
smooch ink to accent
embossing powder, and embossing pad
white painters pen,
White chalk pencil
black liquid applique
sheer plus sheer silver glaze and sheer color glaze
lace, hat pin, beads, charms
Martha Stewart X-mas branch punch (((LOVE this punch, useful for a million projects)))

Next I took a white chalk pencil and wrote my 2 phrases lightly, on the top of canvas it says, "A window to the soul" I wrote with black liquid applique over the top of the words, allowing it to dry on its own so it has a glossy satin finish. On the botton, I used a white sharpie painters pen and wrote" If God made anything more beautiful, he kept it for himself"
Once all of that is dry you are ready to move on. Adding photos and embellishments...
So I cut all my flowers in assorted colors of black and grey, some of them once cut I embossed with embossing powders to give the flower a bit more dimension and detal. And some I just white ink and stamped on top of the black flowers


I really layered and altered plain with inked or embossed flowers. And once I had them assembled I inked with black and white inks, then high lighted areas of the flowers with my smooch inks, and finally adding stickles to some of the petals. Also usin my Martha Stewart punch added branched to the flower layers.


SO once the flowers were completed I added the bling to them


SO that's it.. it looks worse than it is, and really does come together quite quickly, be sure you hop on over the CWC blog and get your cutting files, and digi stamps....
And don't forget to check out the rest of the Cooking with Cricut Design Team members blogs for more great idea's, project's and inspiration, those gals are amazingly talented. Laura, I hope you like this....
*´¨)
.•-:¦:-♥•*´¨) ¸
.•*¨) (¸.•´ (¸.•´HUGS *¸.•´¸.•*´¨)
(¸-:¦:-♥(¸.•´ *Ronnie.•*´¨ ) ¸.•*¨) -:¦:
-♥ ♥.•*¨-:¦:-. ;.•.♥.•*
¨-:¦:-. ;.•.♥


16 comments:
Wow, Wow, Wow! I'm speechless this layout is absolutely goregeous! Anita
Ronnie, this is absolutely incredible! What an awesome tribute to a gorgeous horse ~ your friend will love it. And your flowers are wonderful as are the rest of your embellishments.
Wow Ronnie.. What a great art work you made in this project ! Thanks for your tuto !
Have a great Wednesday ;-)
http://mariaelenaworld.blogspot.com/
what a gorgeous tribute girl. I love that is all in whites/blacks and greys. it is so elegant.
-- dalis
CWC DT
These flowers and butterflies are amazing!!!! BEAUTIFUL!!! Congrats on the new little one! He's adorable.
Wow! Beautiful. Your flowers are amazing, you look like a pro! Thanks for sharing.
Ronnie, this project is absolutely amazing. Love the way you showed how the canvas was painted, great effect. Love the different flowers you crafted, so cool. Wonderful tribute, your friend will love it!
Ronnie, this is stunning, but so is all your work. You're amazing and very talented! I always look forward to every creation!!!
What and amazing creation Ronnie!
My goodness what a stunning elegant project! All those monochromatics look so classy, lovely work!
Hugs
Anne
This is so beautiful! I'm so glad to be part of the CWC DT with you!
Stacey
staceyscreativecorner.blogspot.com
Oh WOW! Your page is gorgeous! I love the flowers and the gorgeous pictures.
Just Awesome! Love all the flower pictures! I will have to give it a go!
xoxo
Post a Comment